Thursday 11 January 2024

Effect of heat pump and electric water heating on our electricity bill in December 2023

Since we had our gas supply removed last year we've used electricity for both our water heating and our home heating. Unsurprisingly, this means we're using more electricity, especially in winter months as we no longer burn gas for heating.

We consumed 222 kWh more electricity from the grid in December 2023 than we did in December 2022.

Our heat pump consumed 168 kWh of electricity in December and the water heater used about 70 kWh. It's been a bit chilly upstairs sometimes so we've also used some small electric heaters occasionally, but clearly we also managed to reduce our consumption of electricity elsewhere as otherwise the numbers don't quite add up.

We had hoped to compensate at least some of the increased electrical consumption by expanding our solar power system. Unfortunately, due to the last quarter of 2023 being incredibly grey and rainy (a new record for rainfall was set, largely due to rainfall in the last three months of the year), the expanded system produced just 42 kWh in December, vs 60 kWh from the smaller system a year before.

Part way into January, waiting for ice to melt off the extra panels so that they could have full performance, if only the sun came out properly...

The gas we didn't burn, and the resulting CO2 emissions
In December 2022 we burnt 125 m3 of gas. That's less than an average apartment and well under half the average for a house like ours. This year we of course burnt no gas at all. 125 m3 of gas contains the equivalent of about 1250 kWh of energy, so the 222 kWh extra electrical energy that we drew from the grid was considerably less than that contained in the gas that we used to burn.

The 125 m3 of gas which we burnt in December 2022 produced 223 kg of CO2 (factor of 1.78). The average CO2 intensity of Dutch electricity for 2022 was 321 g / kWh meaning that our extra 222 kWh of electricity consumption in December 2023 will have led to 71 kg of CO2 emissions if our electricity was of average CO2 intensity for the Netherlands. That's a worst case scenario as even in the exceptionally grey month which just passed, 8% of our electricity still came from our solar panels. We are of course also signed up to a tariff which claims to supply us with zero CO2 green electricity (despite this not always being possible to do).

Therefore in the worst case our emissions in December as a result of replacing the gas supply with electricity were less than a third of what they would have been if we'd continued to burn gas. In the best case we did a lot better than that, but we're then in the realm of guesswork based on where our electricity might really have come from. When a large proportion of Dutch electricity still comes from burning fossil fuels it's nonsense to ever claim that electricity has zero emissions.

An average Dutch household in a home like ours will have consumed around 300 m3 of gas in December, resulting in around 530 kg of CO2 being emitted so in the worst case we had around 1/7th of the emissions of an average household.

Update: Dutch emissions per kWh electricity may actually be much lower.
It's possible that emissions in 2023 per kWh were actually much lower than 321 g. A smart guy on Mastodon calculated that the true figure was actually around 223 g / kWh for the Netherlands in 2023. This would have the effect of reducing our worst case emissions for heating in December to just 50 kg, meaning that we emitted about a fifth so much CO2 this year compared to last, or around a tenth of the amount emitted by an average similar size household using gas for heating.

Costs
It's difficult to work out exactly what the cost of gas would have been, but based on pretending to take a new contract out with our electricity supplier it appears that they would have charged us about €200 for the 125 m3 of gas had we used it in December. The cost of the extra electricity that we used is about €100.

But actually we deliver more electricity to the grid each year than we consume, so we only pay €5 a month for energy. At the moment our supplier says they still owe us about €260. This amount becomes due in mid February so we won't get quite that much returned to us because we expect to use more electricity than we produce for heating in January and February as well.

How well did the heat pump work in the cold ?
The lowest temperature in the morning that we've seen so far was about -7 C. There was plenty of heat from the heat pump. It does need to pause and defrost itself occasionally when it's cold outside.

Onward and hopefully downward
December is the worst month of the year due to the short daylight hours. Let's hope we can take proper advantage of the sun in January, February and March as more sun means lower emissions.

This may look like a grey rectangle but it's an actual photo of the sky today. The sun is roughly in the centre (that's a guess as I couldn't see it). Not exactly ideal weather for solar power.

Wednesday 23 August 2023

An all-electric home with air conditioner (aka air-air heat pump) as heating

Regular readers will know that we had the gas supply removed from our home in April this year. This left us with no central heating in our home. We used a portable 400 W electric infra-red heater in he living room on some of the cooler days of March and April, which worked well enough for those months because our home is now very well insulated, but we knew that in the middle of winter we'd need a more effective form of heating. Having the gas supply taken out meant that we were working under a time constraint - we had to find a solution before next winter. We now have that solution.

Electrical heating
Electrical heating is 100% efficient. All the energy which goes into an electric heater will be turned into heat. Actually, the same thing applies to all other electrical appliances - some of the energy may turn into mechanical movement, calculations, light, sound etc. but it all becomes heat in the end. So everything electrical helps to heat your home at almost exactly 100% efficiency (we lose a tiny bit from light shining out of windows and other small effects).

But just because resistive electric heating is 100% efficient that doesn't mean it's actually a particularly good way of heating your home. Electricity costs more per kWh than gas. Also if gas is being burnt to generate electricity then due to inefficiencies of the power station and transmission lines more gas will be burnt in total to heat your home than would be the case if you had an efficient modern gas central heating boiler.

For a while, around 50 years ago when the future looked like it might be nuclear powered, the idea of storage heaters was popular as they would allow excess "too cheap to meter" electricity generated at night by non-throttle-able nuclear power stations to be used as heat during the day. Homes in the UK were built as "all electric" and I lived in some homes with that type of heating. It worked reasonably well. There was a logic to it, but nuclear is not a technology which is going to come along and quickly save us from ourselves right now. Many of those homes were later retrofitted with gas, which now looks rather unfortunate. Our home in the Netherlands has gone in the opposite direction. Built originally against a promise of cheap endless gas, we've transformed our home to be fully electric.

Heat pumps
Heat pumps on the other hand are popular now. They appear to do something magical in that they generate more heat energy in their output than they consume as electrical energy from their supply. There is of course no magic involved at all. In this house we obey the laws of thermodynamics and we're not creating something out of nothing. Heat pumps actually (mostly) just move heat around. When heating a home in the winter they take heat out of the already cold air, water or ground outdoors, making it even colder, so that that heat can be emitted indoors. It's a neat trick.

The problem with heat pumps sold to replace central heating boilers, providing hot water to flow through radiators or under-floor heating, is that they're very expensive and they're over-sized for many well insulated homes. When I calculated how much gas we burnt last year to heat our home it became obvious that the 28kW gas central heating boiler installed in our home had only burnt enough gas to have operated at full power for the equivalent of about three days in the whole year. The lowest output heat pumps are rated at around 7 kW so one of those would have to run for about 10 days in the year. It would still lose a little in efficiency because the boiler would be on the top floor and the hot water would still have to be piped two floors down to reach the living room, losing some of the heat along the way (even with well insulated pipes), but total energy consumption would be 400 kWh over the year. By comparison, direct electrical heating to provide the same amount of heat would consume about 2000 kWh of electricity in total.

Air conditioners
Air conditioners work in exactly the same way as a heat pump. Many models of air-conditioner can also operate as heaters and when so used they have the same high efficiency as heat pumps. i.e. they produce far more heat as output than they consume from the electricity supply. Even though they don't attract a subsidy they have a much lower price than a heat pump, so we decided to install an airconditioner as our source of heating in the winter.

We could have installed two air conditioners, one up and one down, but we're instead going to try to live with just one in our living room together with occasional use of a portable electrical heater upstairs should it prove to be necessary. We have rarely turned on the upstairs radiators in our home in the past so we clearly don't have much need for heating upstairs, but if it turns out to be necessary nothing excludes the installation of a second air conditioner upstairs. Two air conditioners still cost only about half the price of a heat pump.

The nasty environmental problem with air conditioning and heat pumps
One of the things that has put me off both heat pumps and air-conditioners in the past is the high environmental impact of florinated refrigerant gases. These not only have a disastrous effect on the ozone layer but that also can have a greenhouse effect greater than 10000x that of an equivalent amount of carbon dioxide (GWP = global warming potential). Even the R32 refrigerant often touted as environmentally friendly has about 670x the global warming potential of the same amount of CO2. 

While it's supposed to be the case these days that refrigerant is recovered when airconditioning systems are taken out of use, does that actually happen in reality ? Photos showing destroyed airconditioning units dangling from buildings in war-zones and after natural disasters indicate that a considerable number of these units don't get decommissioned in a manner which is sympathetic to the environment, and even if they are, what do we do to ensure that those gases never escape once they are extracted from an old airconditioner? I'm not convinced that these gases can be contained for the rest of time and do all the old gases make their way safely to one of the few plants which can destroy them ? I don't think I'd like the answers to these questions. Luckily, there is an alternative:

The solution: R290
R290 is a refrigerant with a GWP of just three. Not three hundred or three thousand, just three. On release it has a greenhouse effect only three times as bad as CO2 and it has no no effect on the ozone layer. There is very little refrigerant in an airconditioner, less than half a kg. As such, the total harm than can be done by releasing this gas is very small. R290 is actually just propane, so not a florinated gas at all. As a result of this it's also legal for people to work on R290 systems themselves. No "f-gas certificate" is required for working with R290 here in the Netherlands because it is not an "f-gas". DIY is good - it should reduce the total cost and I like doing stuff.

Our choice of airconditioner
R290 split airconditioners have been promised for some years but they still seem to be new on the market. I picked the only model that I could find on the Dutch market earlier this year, a Midea 3.5 kW air-conditioner. This was the first model of airconditioner ever to win German Blue Angel environmental certification. It took a while to find a supplier as seemingly not many people sell them, but I did find a supplier in the Netherlands.

As this airconditioner has an SCOP of 5.2 it will in principle consume only about 400 kWh of electricity a year to provide as much heat directly in our living room as our old central heating boiler put into hot water which it then pumped around the house. It should operate efficiently down to -15 C which is almost as cold as it's ever been here. It's never been that cold for the entire day. But anyway, if it gets really cold I guess we'll have to go out cycling for a bit to warm up.

To provide power we already expanded our solar power installation with two extra solar panels which will produce about 700 kWh of electricity a year. In total we should easily generate enough electricity each year to supply the air conditioner as well as the electric water heater (for which we installed another two solar panels) and every other electrical device in our home. While in winter months even our over-sized solar setup won't generate enough to run everything, the overcapacity should mean we are able to operate at least mostly on our own electricity for most months of the year.

Now some DIY
The airconditioner turned up a couple of days after ordering and then I ordered a few extra parts to complete the installation.

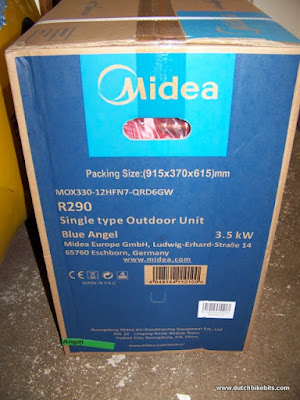
The outdoor unit in a box. Clearly labelled R290 / Blue Angel. Quite heavy to move.

I needed refrigerant lines and electrical cable and I chose rubber feet for mounting the outdoor unit on the ground outside our home. We could have mounted it on the wall but I thought that brought a higher possibility of vibrations being carried into our home (the unit doesn't vibrate much and I now doubt this would have been an issue). Also the wall mounting brackets available didn't seem to be large enough to allow enough space. The outer unit is recommended to be installed 30 cm from a back wall for maximum efficiency.

The first thing was to determine the best place for the inner unit. I decided to place it half way along our living room wall and so high as possible. The instructions suggest a minimum of 15 cm between the unit and the ceiling and that's about the height at which it's mounted. I didn't want visible ducting inside our home so I drilled a single large hole through which all the pipes and wires had to run. This had to run downhill to the outside in order to make sure that the condensate would find its way out through the wall, and in my case I had to run it at a more extreme angle than I otherwise would have because the carport outside our home is attached to the outside wall at the same height as the inner unit of the air conditioner is on the inside wall.

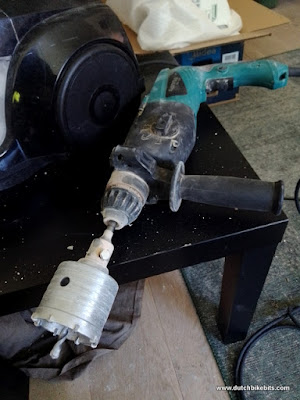
Drill with 70 mm attachment for drilling through concrete. This does not go through in one push. You have to work at it a bit, and stop to let it cool down quite often. You also have to pull out chunks of concrete and brick which fill the tool and stop it from working. It took more than an hour to drill the hole. I had to work from both sides as the wall is over 30 cm thick so I first drilled all the way through both layers of the wall with a long 12 mm drill bit.

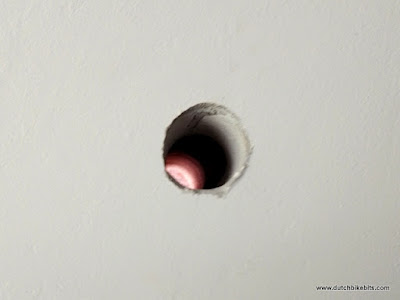
Hole in the wall, sloped downward to avoid the carport outside. I lined the hole with PVC pipe, cut lengthwise so that it could adjust to the right shape and sealed with PU foam. Note: a lot of concrete and brick turned into dust. I worked with a mask on as well as ear defenders and had a vacuum cleaner running continuously, which helped to avoid too much dust finding its way elsewhere in our home.

The refrigerant tubing comes as a reel of copper pipe with insulation already fitted. I was cautious of bending this copper tubing as I'd expect it to flatten if bent too sharply but it unwound without causing any harm to itself and could be poked through the wall to the other side also without harm. I could then attach the pipes on the outside to the external unit. In my case exactly three metres of pipe was required. This was supplied with the required flare to fit both units, making the job a bit easier.

Black plastic covers on the piping of the indoor unit. The indoor unit has high pressure nitrogen inside so there is a hissing noise when they are loosened. That does not mean that refrigerant is leaking - the refrigerant is in the outdoor unit. However it's important that there should be a hissing noise as that indicates that the indoor unit has held pressure, also that it's not been contaminated with damp air. This didn't seem to be written down anywhere so I thought I'd add it here.

By this stage I'd put everything together so that in theory it was ready to go, I then tried to find a contractor to carry out the final step: Before you can set an airconditioner into operation it's necessary to draw a vacuum in the pipes so that there is no air in the system. Only after that has been done is it possible to release the refrigerant from the outdoor unit into the system. Some people don't bother with this step and I assume that their airconditioners don't operate to their full potential as a result.

I didn't have a vacuum pump and I thought it reasonable to let someone with experience do this part of the job for me. I even thought it might save a bit of time. However that turned out not to be the case at all. This was the most time consuming part of the whole project ! I waited over a month for more than ten different contractors to get back to me. They either said they would only with a certain manufacturer's airconditioner, or they wouldn't check other people's work, or they said they were too busy. Eventually, one guy said he'd come and do it. He made an appointment for two weeks in the future... and then he didn't turn up. So this was also to be a DIY job.

The standard price for setting an airconditioner in action is €200. That's what everyone who said they could do the job said they'd charge me, though none of them seemed to need the money. In the end I bought a vacuum pump for €115 expecting to need adaptors and pump oil in addition, but it turned out that everything I needed was in the box with the vacuum pump. This was a very simple and quick job to do, apart from the waiting around. No more than half an hour of actual work.

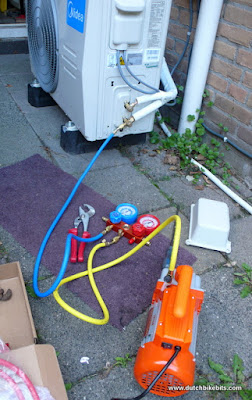
Vacuum pump pulling the air out of the tubing. After half an hour I turned off the blue tap and disconnected the yellow hose.

, which was never an option
The next morning we still have "-1 bar" relative to ambient air pressure so it didn't leak (i.e. close to 0 bar in reality negative pressures can't exist)

So the pump was set up and drew a vacuum for half an hour. I then I disconnected the pump, leaving the pressure gauge displaying -1 bar overnight. After that I let some of the gas into the system, the pressure rising to about two bar so that I could check my connections to the pipework with soapy water to see if there were any leaks (which I'd have to tighten up before going further). There were no bubbles forming so I let the rest of the gas into the system, still no bubbles, then I removed the meter from the outdoor unit, fitted all the covers and switched on. The airconditioner works.

Outdoor unit. The white cover over the cables and tubes goes to just slightly underneath the carport. The inner unit is on the other side of the wall a few cm higher. The switch on the wall is a legal necessity. The watering can catches the condensate so that we can use it in the garden. If the air conditioner is set on cool mode for an hour it produces a surprising amount of water.
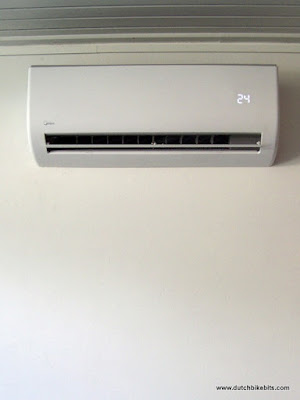
The inner unit on the wall in operation. No visible wires or tubes. Everything works. We've used it to cool a couple of times and it's very effective. Heating has been tried only momentarily because it's summer and we really do not need heating yet. Hopefully this will work as effectively as we need it to in winter. It's very quiet in operation. Almost nothing to hear at all, certainly much less noisy than a table fan even on a low setting. The displayed temperature is what we were cooling to in the summer, not what we heat to in the winter.

We have a heating solution!
So we now have a heating solution for next winter. It will consume less electricity than a heat pump but hopefully provide us with enough heat. It's a bit of an experiment for us to say that we're only going to heat the ground floor, so wish us luck. The kitchen is a bit of a worry because it's around the corner from the living room and dining room. But the kitchen also has other heaters in it, such as a small water heater under the sink, the refrigerator etc. The extra insulation job that I did on the kitchen door a few days ago was specifically intended to try to keep the kitchen warm when we are heating just the living room. We have other plans and there are more things that can still be done. Watch this space.

Did I forget to mention summer ? We installed this air conditioner primarily to provide heat in the winter, but obviously an air conditioner can also be used as an air conditioner. We have done that for a couple of afternoons when it was very hot and I have to say that it's very pleasant to have a cooler home when it's hot outdoors. Luckily these times also coincide with our having excess solar power and the grid being quite full due to the amount of sun beating down on everyone's homes, so we find ourselves still exporting electricity while the airco runs. I don't see a downside to using the air conditioner in this way sometimes. With weather becoming more extreme we might well use it more often. But we don't intend to live in a permanently air conditioned home. When the weather allows, it's much nicer to open the windows.

Getting rid of the radiators and central heating boiler
A job that I've not yet done is to get rid of the radiators and central heating boiler from our home. There's a lot of metal involved, a lot of heavy work. They take up a surprising amount of space. We didn't get rid of these things when we first had the gas removed because that would mean burning a lot of bridges. We might have decided to install a heat pump instead of air conditioning, and that could have worked with our existing radiators (which are oversized to suit our originally under-insulated home). While I'm quite confident, this also means that if the air conditioner doesn't work out this winter, we could still make use of the radiators next year with a heat pump. There's no need for us to rush this.

Car airconditioners
What's the deal with car air conditioners ? From what I can tell these leak all the time and drivers respond by having them "topped up" with more refrigerant, sometimes annually. If there's a crash (and there are always crashes) then the refrigerant is released and having its awful effects on our climate and the ozone layer. Air conditioning in cars really should not be allowed, certainly not with use of refrigerants which are more destructive to the environment than R290.

Cars make everything worse.

Update: The first cold month - November 2023
November this year was colder than usual. We had snow and persistent freezing temperatures which we've not had in November for many years. There was also very little sun. So how well did the heat pump work ?

Gas usage November 2022. We consumed 52 m3 of gas, compared with 119 m3 for an average apartment and 217 m3 for an average house like ours.

In November 2022, which was warmer than this year, we used 52 m3 of gas for heating. That was less than half the amount used by an average apartment in the Netherlands. This year we substituted 105 kWh of electricity consumed by the heat pump. 105 kWh of electricity is equivalent to the energy released by burning about 10 m3 of gas so we're now heating our four bedroom semi-detached home with about 1/10 of the energy required to heat an apartment.

And the CO2 footprint ? Burning 52 m3 of gas results in the release of 92 kg of CO2. The average gCO2/kWh for the Netherlands in 2022 is 321 g so consuming 105 kWh of electricity results in the release of 33.8 kg of CO2 on average. That's about a third of what we produced last year with gas. But even with the particularly grey weather that we've had for the last month we still generated 1/4 of the electricity that we used from our solar panels (and we used 80% of that directly, not relying on the grid too much as a "battery"), which brings us down to around 25kg, or not far from a quarter of last year. We're signed up to an energy contract which promises "100% green" electricity but while that provides a stimulus for green energy producers it doesn't really change what comes from the grid. I hope of course that we're at least providing a push towards producing greener electricity.

But even in the worst case we're looking at a far lower CO2 output than the 386 kg which an average semi-detached house like ours produced last November.

Tuesday 15 August 2023

Two small insulation jobs

We've make improvements to the efficiency of our home every year that we've lived here. Over time there are of course fewer large jobs left to do, but there's always something that can be improved. While installing solar panels or getting rid of the gas supply are more dramatic, the small jobs also reduce our energy usage and help to make the larger improvements more effective. The same small improvements will reduce energy usage in any home.

Over the last 12 months we've done two small jobs. Both of them were as a result of measuring indoor temperatures on outside walls or doors. The aim of these jobs was to improve the insulation of a small section of our outside wall and the rear door which leads from our kitchen directly into the garden.

Adding cavity wall insulation

We had cavity wall insulation installed in our home in 2008. It was one of the first things that we had done after moving into our new home because we knew from past experience in other homes that it was a very effective type of insulation. Unfortunately, the installers missed a bit: While they were concentrating on the large area of cavity wall at the end of our home, there was a roughly 2 m tall by 0.75 m wide piece of cavity wall on the other side of our living room next to our front door which they didn't treat at all. Measuring the temperature of the inner wall in winter revealed it to be easily the coldest spot in our living room. As a result some condensation occurred there and there was sometimes a little mildew to wipe away. I asked many companies to come and do this small job, but none of them were interested. They'd either just say no, or they would quote the same price as for a whole house,  which is not only ridiculous for a half hour job that they could have done at the end of a working day, but also not cost effective. So this had to be a DIY job and I finally got around to doing it in September 2022.

Obviously I don't have access to a professional machine which can inject insulation at high pressure so I would need the holes to be closer together. I decided to use expanding polyurethane insulation. To begin I drilled a couple of holes just a few cm apart to see if the foam was expanding sideways in the cavity and when this was confirmed I started drilling holes about 15 cm apart in a zip-zag pattern. It took about three hole cans of polyurethane foam to do the job. Much cheaper than the quotes I'd received. The holes were filled with mortar and there's now no sign at all that that was done to the wall.

The two holes near the centre were the first test holes. I then drilled holes in a zig-zag pattern up the wall and squirted in insulation until it was visible in the next hole along.

During winter 2022/2023 I could measure an obvious change. The interior wall was no longer cold, but actually slightly warmer than the opposite wall with the professionally applied insulation. We no longer have a condensation problem anywhere in our living room. So this is a definitely improvement. I can't say how much heating energy it saves as that's almost impossible to measure, but it will mean that we require at least a little less heating.

Insulating the back door

The wooden panel under the window in the back door from our kitchen to the garage is the coldest spot in the whole house. As a result it attracts a lot of condensation in the winter and has to be kept clean, and we also lose quite a lot of heat through it even though it's a relatively small area. The door was on the list of things that I intended to replace, but when I came to look for a more efficient replacement I couldn't find one. No-one seems to sell doors like this with insulation inside them. There are plenty of front doors with insulation, but the back door options all have glass right down to floor level, which is not an advantage for us with dogs which will respond to birds or (worse) cats in the back garden. So I decided instead to try to insulate the door that we already have. It's the least expensive and the least disruptive way of insulating our back door.

For this job I made wooden boxes of nearly the width and height of the wooden panel on the door, one to install inside and the other outside. The outer shell of each box is 3 mm thick marine grade plywood while I used 1 cm square wood to make the box form.

Boxes under construction. Marine ply, one cm square section wood and wood glue.

Each box is filled with two layers of aluminized bubble-wrap material. This is not the best insulating material, but I could fit two layers in each box, so there are four layers in total. I also wanted to use a material which would form a moisture barrier and which should reflect some heat.

Two layers of aluminized bubble-wrap type material fit inside each of the boxes. That's four layers in total either side of the existing wooden door. Opinions seem to vary widely about how good an insulating material this is, but four layers of it will of course work better than one. In this case it was selected because it's clean to work with and I'll be able to easily remove these panels from the door if they turn out to be a problem for some reason.

Each panel is nailed in place, with a layer of sealant between the box and the existing door.

Plenty of nails to make sure that the sealant really does seal. I don't want moisture getting inside.

After fitting the inner and outer panels they were both painted to match the door.

Before and after. The existing door was not in perfect shape, but most of the damage is now under the new panel so it should be more resistant to the weather than it was before. We will see.

So now I wait to see how well this works. In the summer when the door is in full sun I've been able to measure a 10 C difference in temperature on the inside of the door between the outer part of the door not covered by the new panels and the inner part of the door which is covered so it must already be helping to reduce the temperature of our home during the summer months. I'll make measurements during winter and add them here.

I wouldn't have done this to a new door, but our door was showing its age already so I'm hoping this will extend its useful life. While there is no rotten wood (there was some on the inside but I fixed that problem several years ago) there were gaps between the panels into which rain could penetrate. I'm hoping that the new outdoor panel will stop this from occurring, but of course if rain gets inside the panel that could create a problem. It's an experiment.

As with the cavity insulation job, I don't think it will ever be possible to measure exactly how much energy is saved by insulating this door, but it should mean that we need a little less heat next winter. As the next job is to change the way we heat our home, this will be important.


A previous blog post covered other small insulation jobs.


Monday 17 April 2023

More more solar panels. Do we now have enough energy for a gas free home?

We now have four solar panels on our garage roof. They're at an angle so that they face exactly toward the south.

Today with help from a friend we installed two more solar panels on our garage roof. This means we have four 400 W panels on the garage roof to work alongside the sixteen 235 W panels which are on the roof of our home.

The original two garage mounted panels were in the shade until about 9 am so you can see from this graph that they suddenly "wake up" at that time. The new panels placed today do better a few minutes earlier as they'll be earlier out of the shade.

The roof of our home is oriented south west, while the panels on the garage are oriented directly toward the south so as discussed a few days ago they compliment each other. The garage is shaded by our neighbour's home early in the morning but as the new panels are further to the south and will be shaded less (even though to arrange this we had to push the older pair slightly further north) we're hoping that we see a little bit more electricity early in the morning than was previously the case.

The new set of panels, closer to the camera, are mounted at just 12 degrees, vs. the 24 degrees of the set which we put up last year. This will mean they have slightly lower output overall, but they will shade the older set behind them less often due to being lower at the back and they will catch the morning sun from the east a bit better due to their lower angle creating less of a self-shadow.
The usual "back of an envelope" design process

Last time I couldn't get commercially made hooks as everything seemed to be sold out everywhere. This time I used commercially made hooks to hold the solar panels in place as they were available inexpensively. Otherwise the frame which these panels are mounted on is very similar to that of the last pair of solar panels except that they're at 12 degrees from horizontal this time instead of 24 degrees. This is to decrease the chance of the new set of panels putting the slightly older set behind them in shade and to hopefully increase their output early in the morning when the sun comes from the east. We'll see if that works out.

So far as possible I collected the parts required for this job by bike. Three meter long pieces of wood do make for a slightly unusual sight on the cycle-path.

In total the bill for the two new panels, all the parts required to make the brackets and all the parts required to make a safe connection to our electricity supply added up to about €550.

Helping a friend with his installation a few days ago. He then helped me today. Doing things for each other certainly helps to keep costs down !

We now should have enough energy

Our gas supply was removed last week so we need to have a heating solution for next winter which does not involve gas. As discussed a couple of weeks ago, we actually didn't use much gas at all, so replacing it shouldn't require too much electricity. Added to the overproduction of electricity which we already had before they were installed, the new panels ought to be enough to make our net electricity consumption very close to zero for the year.

As it stands right now, our energy company is asking us to pay €5 a month for energy, with an expectation that we will have overpaid by €290 at the end of the year. That seems to be working out quite well !

Over the summer we installed the heating system which the two extra solar panels will supply, a poor man's heatpump. This was too inexpensive to attract a subsidy but it should be enough for us.

Wednesday 5 April 2023

Eleven years of rooftop solar power - and it's a new record year

Our rooftop solar panels have been in place for eleven years, and the highest output year was the most recent. In total the rooftop panels have delivered 37591 kWh to date.

When we had our rooftop solar panel system installed in April 2012 we were told to expect an output of no more than 3150 kWh per year due to the angle of the panels and the direction they face on our roof. We were also warned that output would drop slowly over time. In practice we actually saw an average of 3357 kWh over the first ten years. Until now the highest output year was the second year after they were installed with 3516 kWh, but that record was broken in this last year, 2022-2023, which is year eleven for our system. No less than 3614 kWh of electricity came from our panels last year, which is nearly 3% more than the previous record.

We actually generated a little more than this because we added a couple of extra panels in September. But because these have only been operating through the darker months until now, they've only added slightly to the total, bringing it to 3780 kWh.

The new peak output wasn't the result of a particularly sunny winter. March, was particularly cold and dark, with snow and hail and produced the third lowest amount of solar power from our roof top panels since they were installed. Luckily, April has brought far more pleasant weather so far.

March 2023 was one of the darkest ever and even the extra panels didn't bring our total for the month to a total which was as high as the average over the ten previous years

The effect of panels facing in different directions

The extra panels on the garage face are installed facing directly south while those on the top of the house face south-west as that's how our house is built. This means that the sun hits the extra panels on the garage earlier than those on top of the house and that we have significantly more solar power earlier in the day now than was the case when we only had the panels on the top of the house.

Proportion of theoretical maximum output achieved by the solar panels on our house roof and those on the garage roof on the day of writing. Having panels facing in different directions flattens out the production curve meaning that we can cover our own usage for a larger proportion of the day.

Early in the morning all our solar panels are in shade, only receiving indirect light. The output of the panels on the garage suddenly come out of the shade of our neighbour's home at about 9:15, giving a rapid rise in output, today seen as a rise from from 5% to 22% of their potential. On the other hand, the panels on the roof of the house don't see a sharp rise due to an obvious shadow, but because of the angle of the roof they don't reach 22% of their potential on the same day until more than an hour later, around 10:30. This difference means that while on a day like this the output of the roof top system alone wouldn't reach 1 kW until nearly 10:45, adding two extra panels on the garage have brought that forward by more than half an hour.

Our garage roof at just after 09:00 this morning. These panels are at a 45 degree angle because that means they face directly toward the south. The sharp shadow line is due to our neighbour's home. The sun has melted the ice off of most of one panel and output is increasing rapidly as the panels receive direct sunlight. When we install two extra panels these two will be pulled back by about half the width of a panel and the two new panels will see the sun slightly earlier each morning than these do.

Doubling the size of the installation on the garage should mean on a day like this we can reach an output level of 1 kW by about 9:45 and 2 kW by just after 10:30. As such, two extra panels will address a source of slight annoyance - ever since the roof top system was installed we've observed that turning on appliances like our washing machine in the morning meant that we drew energy predominantly from the grid instead of from our solar panels, but with four panels facing south on the garage to take up the slack while the larger array on the roof "wakes up" this will no longer be the case - at least in summer.

No more gas so we will probably need more electricity than before

Our gas supply is being removed next week. We've already not used it for some time. In the future we'll probably need a bit more electricity than now so extra capacity is of course helpful.

Effect on a possible future battery installation

If we install a battery in the future, which we are considering in the future, it will have less to do because we will already have improved our autonomy by covering more of our morning electricity usage directly with solar power, thus reducing stress on a battery as it won't have to cover such a large proportion of our energy usage during mornings. I had hoped to have figures for the year so far showing improved autonomy compared with last year, but due to the very dark winter it hasn't been possible to produce those, so that's something for a future blog post.

Tuesday 21 March 2023

Having the gas disconnected

Having the gas connection removed from a home in the Netherlands costs €869, except that it's subsidized at the moment so costs nothing at all. What better time can there be to remove fossil fuels from your home ? Our gas supply will be cut off in a few weeks time.

It's taken us a bit longer than I'd hoped to get to this point but in a few days our gas supply will finally be cut off. We stopped cooking with gas many years ago, but we still had gas central heating and a gas hot water heater for our shower. It was the latter which stood in the way of getting rid of gas altogether as having no hot water in our bathroom at all, especially over winter, was not at all appealing. However we installed an electric water heater last month which then meant we no longer had a good reason to still have a gas supply to our home.

How much gas, how much CO2 ?
For some odd reason our energy company decided that our annual summary of energy usage should be over a period of February 23rd 2022 to March 11th 2023 this year. That's two weeks longer than a year and includes more of the cold days. The summary shows that we consumed 540 m3 of gas. That's considered to be quite low, but it's still a lot. 540 m3 of gas emits almost a whole ton of CO2 when it's burnt (multiply cubic metres of gas by a factor of 1.78 to find how many kg of CO2 are produced), and that's something that we really do not want to do.

An absurdly over-sized boiler

In February we used 48 m3 of gas, about a third of an average
apartment or under a fifth of an average "2 onder 1 kap" (semi-
detached) home similar to ours.
This morning I worked out that the water heater which we removed last month actually accounted for slightly more than half of our total gas consumption for the year. Subtracting the equivalent of 12 summer months (when the central heating is turned completely off) from the entire years gas consumption suggests that only about 245 m3 of gas was used by the central heating boiler last year.

Burning 245 m3 of Dutch gas (at 33.32 MJ/Sm3) releases about 8163 MJ or 2270 kWh of energy. Our gas heating boiler is a Radson EHRE 240 from 1993 with a rated output of 28 kW. It's been obvious for years that it was grossly over-sized - I had to take action a couple of years ago to make it shut down sooner to stop us from getting too hot - but it wasn't until now that I calculated how absurdly powerful it was. A 28 kW output with consumption of 245 m3 of gas suggests that over the whole year this thing only actually operated for the equivalent of about 3 days at full power, spread over the colder five months of the year when we needed heating. i.e. On average it was used for less than half an hour a day.

The beast awaiting removal
Because we put a lot of effort into insulating our home, we can now make our living room and dining room (i.e. most of the ground floor of our home) heat up slowly with nothing more than a 400 W IR electric heater even on very cold days. Clearly we don't need anything like 28 kW !

The boiler dates from before condensing boilers were common-place. Its rated efficiency is 83%. It also doesn't have a balanced flue but instead takes air from the boiler room in which it sits (getting rid of it means we can insulate that room properly and gain a small storage room on the top floor) and as the heated water we receive from it on the ground floor has travelled two floors down to reach our living room and slowly gurgle around the radiators we clearly don't get the benefit of much of the 2270 kWh of energy released by the gas as heat in our living room.

So what now ?
We have decisions to make. Even a few small resistive electric heaters switched on when we're near them would be a more efficient way to hear our home. A friend of ours has reported good results from using an air conditioning unit to heat his living room this winter, and that's definitely more efficient than a resistive heater, but it does make a bit of noise. We will also need some heat upstairs, in the bathroom, bedrooms, work room etc. We've also been working on improving ventilation in our home so fitting a ventilation system with heat exchanger where the old boiler used to sit on the top floor would probably be beneficial. We have decisions to make over the coming months: By December it'll be cold again. 

Hoping to reduce our energy bill further
Last year a quarter of the total gas bill of €1051 was the connection charge. This year our gas bill will be much lower but it won't be zero as we'll still have to pay the connection charge for however long it takes to be disconnected. While gas cost us €1051 last year, our total energy bill for the year was only €587 once we took off the amount that the energy company paid us for nearly 900 kWh of excess electricity that we generated with our solar panels, as well as various other compensations and apparently random things that I've never understood which always appear on energy bills.

Anyway, the energy company decided that we had overpaid by €180 so they're sending us money, which is of course welcome. Then they set our monthly payments this year to be a bit higher than they were last year, which doesn't seem very logical under the circumstances, but they did this last year as well so I'll again have to argue it down this year.

We already added two extra solar panels at the end of last year to roughly cover the water heater's consumption and our plan now is to add a couple more panels again which should leave us with about 1600 kWh per year free compared with last year which we can use for heating. Hopefully that will be about enough. If we end up generating about as much extra electricity as the heating consumes, then not only will we no longer have any fossil fuels in our home but our bills should also be well on the way to zero.

Of course it's impossible to work out exactly what anything will cost because energy bills are absurdly complicated. While we work out how to reduce our energy consumption and CO2 output, perhaps the energy company can put some effort into making their bills understandable.

Job completed earlier than expected


Update 11th April: Our gas supply was removed this morning. Two gentlemen turned up with a digger and made a huge hole in the front garden, removed the supply pipe and the meter from indoors, and then they made everything neat again. So that's it - we no longer have any fossil fuel to burn.

In other news, I took delivery of two more solar panels a couple of days ago. So in a little while I'll write something more about our solar power system.

Over the summer we installed our heating system, a poor man's heatpump. This was too inexpensive to attract a subsidy but it should be enough for us.

Update: Someone was wrong on the internet. Me. So I fixed it.
Somehow I initially made a calculation suggesting that the gas boiler ran for only five minutes last year. This should not have got past my own internal 'smell test'. The boiler actually ran for the equivalent for about three continuous days and the blog above has been updated to reflect this. The other calculations were correct.

Wednesday 8 February 2023

Electric water heating - finally got rid of the pilot light !

There's nothing much more boring than a photo of a cylindrical water heater hanging on the wall, but there it is boringly getting on with its job, heating the water for our shower and bathroom using solar power from our roof and our showers definitely don't mean burning gas any more !

Over three years have passed since I calculated how much gas the pilot light in our water heating system was consuming. It was a bit frightening. 134 cubic metres a year, That means the pilot light wasted almost twice as much gas each year as we just used for heating our home for the whole of January. What's more, 134 m3 at the current price of around €1.80 per m3 works out as about €240, which due to everything else we've already done to reduce our energy consumption is about half of our total annual energy bill for electric and gas combined (we've paid €40 a month for the last year, and the energy company currently owes us money). It's been at the back of my mind literally since I first made that calculation that I had to do something about it, but there are always other things to do and it took until this week until it happened.

Of course I went through all options, including such things as heat pump water heaters. These appear to only be available in absurdly huge sizes meaning more waste, with costs that are simply too high, and with unknown reliability compared with a simple resistive heater. I also considered complete heating systems including water, but most of the year we unplug our heating system so this seemed less than optimal. Eventually I decided that a simple hot water tank, was the best option so long as it could be well insulated and with some kind of control to stop it wasting energy when we didn't need the hot water.

I should have been able to write this last year. I ordered a water heater in September which got delayed due to covid and then didn't turn up at all. After sitting on a waiting list for several months I eventually asked the company I'd ordered it from for a refund which they sent promptly, so I can't really complain about that. Anyway, I then ordered another type which arrived less than 48 hours after I'd ordered it. It's supposed to be a "DAT Arca 80 litre anti-kalk" (anti calcium) boiler, but for some reason what turned up has "GOT" written on it instead. Before ordering I tried to work out whether I'd be able to buy spare parts, and it seems I can. Not that there's much in this thing to go wrong.

Between the two orders I did a bit of extra research which led me to prioritize buying a boiler with a dry heating element which should last longer.

Smart vs dumb boilers

Some boilers are "smart". The main reason why smart boilers are claimed to use less electricity every year than the boilers with dumb controllers is simply that the dumb boilers are typically switched on 24 hours a day, consuming electricity to make warm water when no-one will use it. Smart boilers include such features as analysing your use for the first week and then only warming water when it thinks you'll need it. That's not a bad idea, but we don't really have a fixed weekly pattern of use so I'd have had to use it as a time switch instead.

At the moment the controller consists of a simple analogue clock style time switch and I've also got an energy meter connected up to let me measure electrical consumption over time.

I have no interest in any "smart" IoT product as connecting things like this to the internet means yet another thing to worry about with potential spyware and software updates (if they happen at all they'll be phased out before the lifespan of the product) so I never had any intention of connecting the boiler to the internet. However the company who made the first product only sold the model of their boilers which had thick insulation alongside the smart controller so that forced the issue. Luckily I found an alternative product that combined 30 mm of polyurethane insulation with a simple dumb thermostat. Perfect for us. I think I would have ended up using the smart controller as nothing more than a time switch anyway, and a cheap analogue time switch for then €5 does the same job.

Matching consumption to available solar power

I also found that some companies were offering "anti-salderings" boilers at extra cost. These come with lower power elements than usual as a better match to domestic solar power installations.

Underneath the easily removed plastic base of the boiler is this mess of wires. Disconnecting the two white wires from the second element halves the energy consumption, making it more compatible with using excess solar power.

The idea of this is to ensure that to the greatest extent possible you only use your own electricity. This is because Dutch energy companies don't give you very much for any extra kWh that you export to the grid, and no-one is quite sure what will happen in the future to the existing rules around this. So when I found it was possible to buy a 1500 W boiler which actually has two 750 W elements wired in parallel, that's what I chose because this can also be run as a 750 W boiler which happens to come with a free spare element. The company that we bought our boiler from also offers an anti-salderings version of the same boiler for €50 more. Does this differ in any way other than only having one element wired up ? I don't know.

Size

The size of the boiler was a topic of much discussion. I'd have been happy with a 30 l boiler, but my wife insisted on 80 l.

The biggest problem with buying a fairly large boiler was the weight. This thing weighs 32 kg. Holding up there above my head over the stairs while Judy helped push it into place to hook it onto the supports that I'd already fitted in the wall took a lot of effort. The bathroom is just behind the wall on the right. This was the closest place to the bathroom where we could install the water heater. This means less loss due to long pipes than was the case with the gas water heater. As you can see, I'd not yet done the plumbing or electrical work when this photo was taken.

I'm almost totally bald while Judy has long hair so it's no surprise that she thought a larger boiler would be necessary. I've done calculations which I think reliably indicate that 50 litres would be more enough for Judy, but as we're grandparents now we might actually need to run a bath for our favourite visitor at some point and that could mean needing more water. The extra large boiler will cost a bit of extra energy, but we can compensate by running it slightly cooler and letting the shower mix in less cold water. But in any case we should have solar power to spare - I expanded the solar installation in September when I ordered the first water boiler specifically in order to cope with this.

Tidying up

The water pipes to the gas heater have been removed but the heater is still in place in the boiler room alongside the central heating boiler (which doesn't get used much, but . I'll get rid of it when the gas central heating boiler is removed, a job which I will probably have to get someone else to do so they can do both at once. Until that day it's doing us no harm and it's perfectly safe - the gas pipe the gas boiler has a tap on it which which is now switched off.

How much energy does it use ?

After three weeks of operation, with us having showers as frequently as usual, the water heater had consumed 44 kWh of electricity. That works out as an expected consumption of about 770 kWh per year to cover all our hot water usage, which would cost about €300 at today's electricity prices. By comparison, the consumption of our old gas water heater's pilot light was 134 m3 per year. At today's price that amount of gas would cost over €400 per year, and remember that that was just for the pilot light. i.e. it didn't include the gas used for actually making hot water that we washed with. So all else being equal, replacing the gas water heater with electric would save us about €10 a month. i.e. it would take about three years before the new water heater has paid for itself in reduced cost.

We expect these extra solar panels installed in September to
generate about the same amount of electricity as the water heater uses
But all else isn't equal: The extra 800 W of additional solar panels which we added to our rooftop system a few months ago should generate approximately the same amount of energy each year as the water heater consumes. As a result, our annual energy cost should just drop by the price of the gas that the water heater burnt, which worked out as about €40 a month. That's quite a significant number for us because €40 a month just happens to be exactly the  same amount as we've paid for our electricity and gas together over the last year.

So as we stand right now our energy bills ought to be very close to zero in future even if we do nothing more to improve efficiency of our home. But that's not the plan. We will of course continue to do more to make our home more efficient, and there will be more blog posts about it.

It's also a battery / storage heater

An instant water heater would consume electricity when it is used. i.e. nighttime showers could not be powered by our solar panels. But with this hot water tank our showers can be powered by our solar panels even if we shower when the sun isn't shining. Another effect of having a tank of hot water heated from solar power during the day to warm our water is that small amount of heat leaking from the water tank is released 24 hours a day. i.e. some of the energy stored by the water heater during the day is released at night, keeping the upstairs of our home slightly warmer in winter.

Why not install solar thermal water heating ?

A perfectly reasonable question, which someone asked on social media. My answer is as follows:

In total the panels, the boiler and all the parts needed to install everything cost less than €1400. It would have cost at least twice as much to install a thermal solar water heater. Also, we'd still have needed to buy the  electric boiler (a more expensive version of it with pipes as well as electric heating) because if we'd gone with solar thermal that would almost certainly not heat the water sufficiently in winter. By doing it this way, all the solar panels on our house & garage combined can contribute to water heating, not just a smaller area so it's likely to work better on darker days.

In addition, the extra solar panels are on the garage roof were easily to reach safely at a low work height while thermal solar panels would have had to be installed on the much higher roof of our home. So in addition to this being a cheaper way of heating water than thermal solar, I also did not have to clamber about on the roof of my house (nor pay anyone to do that dangerous job for me), didn't have to make holes in the roof for pipes which could leak, and there's no risk at all of leakage due to pipes being frozen in winter.

And think of future maintenance. The water heater and solar panels function completely separately from each other. i.e. either can be replaced without affecting the other component of the system.

I don't think that thermal solar makes much sense these days. It did in the past when PV panels were far more expensive than they are now. My father-in-law made his own solar water heating panels in the 1980s. This was an interesting project, they were made of copper sheeting with copper pipes soldered on, all painted black, in an insulated wooden box with glass in front. They were very effective and I enjoyed a few nice warm showers from that system in the summer. But it worked out in large part because they built a home around the system so the panels could be larger than commercial systems and ideally located to work with gravity. Around the same time I was experimenting with my first solar electric panels on my roof, but they produced very little electricity for their size and cost and it would have been completely impractical to use them for heating water. For many years I thought we'd end up with solar thermal water heating, but they were always difficult to install on a standard home, and this is now a better way of doing it.


Anyway, that's another DIY job finished, and we've taken another step in the direction of complete independence from fossil fuel.